What Is a Radon Area? The Complete Answer
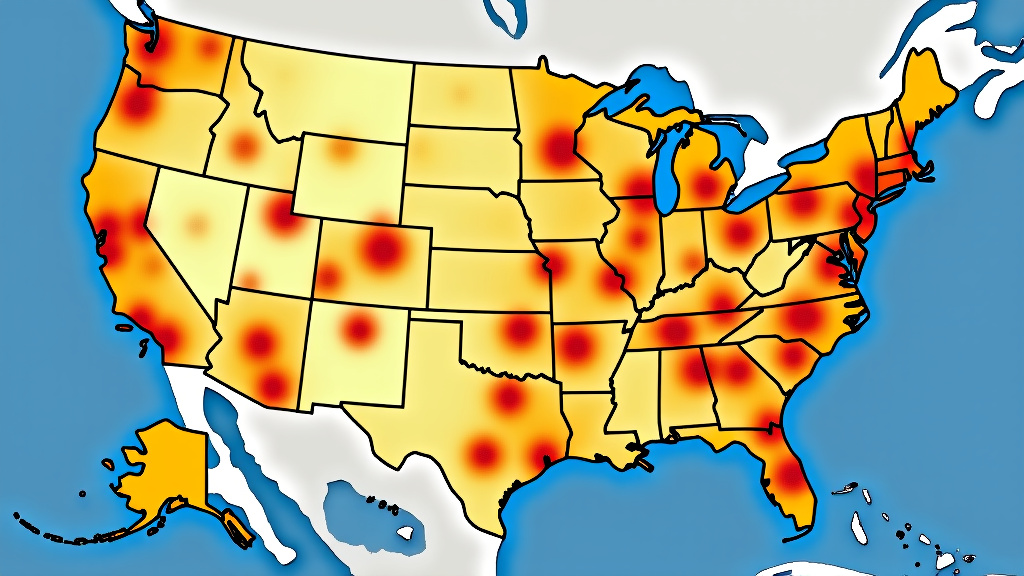
A radon area is a geographic region where the soil and rock have a higher potential to produce or allow radon gas to seep into buildings. The U.S. Environmental Protection Agency (EPA) maps the country into zones based on this estimated radon potential. In these areas, testing your home is especially important.
Radon is a naturally occurring, invisible, and odorless radioactive gas that comes from the ground. It can enter homes through cracks in the foundation and become trapped inside. Prolonged exposure to elevated levels is a serious health risk, making awareness of your local radon zone a key part of home safety.
- A radon area is an EPA-defined zone with higher estimated radon levels in the soil.
- The EPA uses three zones (1, 2, and 3) to classify radon potential across the U.S.
- Zone 1 areas have the highest potential, with average radon levels above 4 pCi/L.
- Zone 2 areas have moderate potential, and Zone 3 areas have low potential.
- Regardless of your zone, testing your own home is the only way to know your true risk.
Below, we break down exactly how these areas are determined, what the zone numbers mean for you, and the simple steps to assess and reduce radon in your own home.
How the EPA Creates a Radon Map of the United States
So, how do scientists actually figure out which areas have more radon? They don’t just guess. The U.S. Environmental Protection Agency uses a mix of science and field data to create its official radon potential map. Think of it like a weather forecast, but for a gas you can’t see. The goal is to identify regions where the underlying geology makes radon more likely.
The process relies on several key factors. First, they look at the type of rock and soil in an area. Certain rocks, like granite and shale, naturally contain more uranium, which decays into radon. Second, they consider the soil’s permeability—how easily gas can move through it. Sandy, loose soil allows radon to travel farther than dense clay. Finally, and most importantly, they analyze thousands of actual radon test results from homes and buildings across the country. This real-world data helps confirm their predictions.
Zone 1: High Radon Potential
When you hear “Zone 1,” think high alert. These are the areas the EPA identifies as having a relatively high radon potential. By definition, Zone 1 areas have an estimated average indoor radon screening level of **4 picocuries per liter (pCi/L) or higher**. That 4 pCi/L number is a big deal. It’s the EPA’s recommended action level—the point where they suggest you install a radon mitigation system.
Does being in Zone 1 mean your home definitely has high radon? No, not exactly. It means your **geological odds are higher**. Radon levels can vary wildly from one house to the next, even on the same street. The only way to know your specific risk is to test. A neighbor’s low reading doesn’t guarantee yours will be low, and vice versa. Many experts stress that Zone 1 simply signals a greater need for homeowner awareness and testing.
Common States and Regions in Zone 1
The Upper Midwest and parts of the East Coast often see the highest radon potential. States like North Dakota, Iowa, South Dakota, and parts of Pennsylvania and New York frequently have large Zone 1 areas. Mountain states like Montana, Wyoming, Colorado, and Idaho also have significant high-potential zones due to their rocky geology. If you live in or are moving to these regions, testing isn’t just a good idea—it’s a critical step for home safety.
Zone 2: Moderate Radon Potential
Zone 2 is the middle ground. These areas have a **moderate estimated indoor radon potential**, with average levels projected to be between 2 and 4 pCi/L. This range is right at or just below the EPA’s action level. You might think, “Close enough—no problem.” But remember, these are averages. Thousands of homes in Zone 2 areas still test above 4 pCi/L.
Living in Zone 2 means you can’t let your guard down. Radon levels are driven by local geology, which can change over short distances. A new housing development nearby or a change in your home’s foundation could influence what seeps inside. The prudent advice for Zone 2 is the same as for Zone 1: test your home. The EPA still strongly recommends testing for all homes, regardless of zone.
Zone 3: Low Radon Potential
Zone 3 areas have the **lowest potential**, with estimated average radon levels below 2 pCi/L. These zones are more common in coastal plains and areas with less uranium-rich bedrock. While the overall risk is lower, “low potential” doesn’t mean “no risk.”
We’ve found that radon is a sneaky guest. It can appear in pockets even within Zone 3, especially if a home is built on unusual soil or has a cracked foundation. A 2020 study highlighted in the Journal of Exposure Science & Environmental Epidemiology confirmed that radon can be elevated in any state. For homeowners in Zone 3, testing provides valuable peace of mind and confirms that your indoor air is safe.
What the Radon Zone Number Means for You and Your Home
Here’s the most important takeaway from all this science: **your EPA radon zone is just a starting point**. It’s not a personal risk assessment for your house. It’s a community-level guide for public health planning and building codes. Many local health departments use this data to decide which areas need more public education about radon.
For you, as a homeowner or renter, the zone number has two direct implications. First, it tells you if radon is a **recognized geological concern in your area**. This should influence your decision to test. Second, it can affect real estate transactions. In high-potential zones, buyers and sellers often include radon testing as part of the inspection process. Some states even require disclosure of known radon issues.
Why Your Neighbor’s Radon Test Doesn’t Count for You
A common mistake is assuming that if a nearby home tested low, yours will too. Radon is incredibly localized. It depends on the tiny cracks in *your* foundation, the pipes penetrating *your* slab, and the specific soil directly under *your* home. Think of it like a rain gauge in a storm. One house might get an inch of rain while another a block away gets two, depending on where the heaviest clouds drifted.
The Surgeon General has stated that **radon is the second leading cause of lung cancer** in the United States. The risk depends on the level and the length of exposure. You are breathing the air inside your own home every day, so its specific level is what matters. Don’t gamble on an assumption. A simple test kit can give you a definitive answer for your living space.
Simple Steps to Assess Your Radon Risk
You don’t need to be a scientist to figure out your radon level. The process is straightforward, affordable, and something you can often do yourself. The EPA encourages all homeowners to take these steps.
Step 1: Get a Test Kit
You can buy a **short-term radon test kit** from most hardware stores or online for under $20. These kits typically measure radon levels for 2 to 7 days. They are easy to use—usually just a canister or charcoal packet you place in the lowest lived-in area of your home. For the most accurate picture of your year-round average, you can also purchase a long-term test kit that stays in place for over 90 days.
Step 2: Follow the Instructions Precisely
Placement matters. Test in the **lowest level of your home that is regularly used**—like a basement family room, den, or bedroom. Don’t test in the kitchen, bathroom, or a seldom-used closet. Keep the kit away from windows, doors, and drafts. The test needs to capture a representative sample of the air you breathe daily.
Step 3: Analyze the Results
Once the test period is over, you’ll send the kit to a lab or read a digital monitor. Your result will be in picocuries per liter (pCi/L). If the number is **4.0 pCi/L or higher**, the EPA recommends installing a radon mitigation system. If it’s between 2.0 and 4.0 pCi/L, you might consider retesting with a long-term kit or installing a system, especially if you have young children or spend a lot of time at home.
If Your Test is High: Radon Mitigation is Not a Major Hassle
Receiving a high radon test result can feel alarming, but the solution is surprisingly simple and common. A **radon mitigation system** is a proven technology. The most common method is a sub-slab depressurization system. A certified professional drills a small hole in your foundation floor, inserts a PVC pipe, and attaches a fan that runs silently in your attic or outside.
The system creates a vacuum under your home, drawing radon gas from the soil before it can enter. The pipe then vents it safely above your roofline, where it disperses into the outdoor air. Installation typically takes a few hours, and systems are very effective, often reducing radon levels by over 90%. The cost is usually between $800 and $1,500, a small price for long-term safety and peace of mind.
Your Radon Risk Checklist
Don’t let the jargon overwhelm you. Use this simple checklist to protect your household.
- Check your EPA radon zone map to see if your area is Zone 1 or 2.
- Purchase a radon test kit for your lowest living level.
- Place the test correctly, away from drafts and appliances.
- Send your kit to the lab promptly for analysis.
- If results are 4.0 pCi/L or above, contact a certified radon professional for mitigation.
- Retest every two years, or after major renovations, to ensure levels stay low.
Conclusion
Understanding what a radon area is gives you a critical head start on home safety. The EPA zones are a helpful guide, but they don’t tell your home’s specific story. Whether you live in a high-potential Zone 1 or a lower-risk Zone 3, the only way to know your true exposure is through testing. Radon is a hidden risk that varies from house to house. The good news is that testing is simple, and effective solutions are readily available if needed. Your most important next step is to buy a test kit and place it in your lowest lived-in level today.
Frequently Asked Questions
How often should I test my home for radon?
You should test your home every two years, or after any major renovations that could affect your foundation. If you’ve never tested and are in a higher-risk zone, testing annually is a wise precaution. Retesting ensures your mitigation system is still working and your levels remain safe over time.
Does a new home still need radon testing?
Yes. Newer homes can still have high radon levels. While modern building codes in some zones may require radon-resistant construction, it’s not universal. The EPA recommends testing every home, regardless of its age, to confirm its actual indoor air quality.
Can radon affect a home with a slab foundation or no basement?
Absolutely. Radon gas can seep through tiny cracks in a concrete slab or enter through the joints where the slab meets the walls. You should test the lowest level you regularly occupy, even if it’s a ground-floor living area or a slab-on-grade home.
What is the average cost to fix a radon problem?
A standard radon mitigation system typically costs between $800 and $1,500 to install. This is a one-time expense for a system that can last for decades. Considering it addresses a serious health risk, most homeowners find it to be a worthwhile investment.
Is radon only a problem in the winter?
No. Radon levels can fluctuate, but a high test result in any season indicates a year-round risk. Levels often rise in winter when windows are closed and homes are sealed tight, but a high reading means you should install a mitigation system regardless of when you tested.